| “This site contains affiliate links for which OEMDTC may be compensated” |
March 1, 2018 NHTSA CAMPAIGN NUMBER: 18V139000
Air Inlet Door may Detach Causing Windows to Fog
If condensation or fog cannot be cleared, the driver’s visibility may be affected, increasing the risk of a crash.
NHTSA Campaign Number: 18V139
Manufacturer Jaguar Land Rover
 North America, LLC
Components VISIBILITY
Potential Number of Units Affected 7,090
Summary
Jaguar Land Rover
 North America, LLC (Land Rover
 ) is recalling certain 2018 Range Rover Velar vehicles. The air inlet door linkages for the ventilation system may detach, preventing the system from clearing fog or condensation from the windshield and windows.
Remedy
Land Rover will notify owners, and dealers will update the vehicle software to control the length of movement of the ventilation actuator arm, free of charge. The recall began on April 16, 2018. Owners may contact Land Rover
 customer service at 1-800-637-6837. Land Rover
 ’s number for this recall is N143.
Notes
Owners may also contact the National Highway Traffic Safety Administration Vehicle Safety Hotline at 1-888-327-4236 (TTY 1-800-424-9153), or go to www.safercar.gov.
Check if your Land Rover has a Recall
| SAFETY RECALL N143 (NHTSA 18V139): HVAC INLET DOOR LINKAGE | SERVICE BULLETIN |
| 22-MAR-18 | NO.: SRE18-08 | SEC.: RECALL | MKT.: USA |
Jaguar Land Rover
 North America, LLC has informed the National Highway Traffic Safety Administration (NHTSA) of its intent to perform a voluntary Safety Recall on certain 2018 model year Land Rover
 Range Rover Velar vehicles imported into the United States market. Information relating to this Recall will be posted on the National Highway Traffic Safety Administration website.
United States Federal regulations require that retailers must be notified within a reasonable time after the manufacturer decides that a defect that relates to motor vehicle safety or a noncompliance exists.
United States Federal law requires retailers to complete any outstanding safety Recall service before a new vehicle is delivered to the buyer or lessee. Violation of this requirement by a retailer could result in a civil penalty of up to $21,000.00 per vehicle.
This Recall Service Bulletin serves as notification to all Land Rover retailers in the United States and Federalized Territories that any affected new vehicles may not be sold and delivered for customer use until the Recall repair is completed.
THIS BULLETIN UPDATES SRE18-07
DESCRIPTION OF ISSUE
An issue has been identified on a limited number of Land Rover vehicles within the listed Affected Vehicle Range the air inlet door linkages within the climate control system may become detached and, depending on operating mode position, cause unexpected severe condensation / fogging of the interior windows..
AFFECTED VEHICLE RANGE
Range Rover Velar (L560)
Model Year: …………….. 2018
VIN: …………………………… SALYM2RV9JA700315-SALYB2RX4JA740292
A total of 7,090 vehicles are potentially involved in the United States and Federalized Territories. Visit the Land Rover InfoTrail website for a list of affected unsold vehicles (as of 15 March 2018).
EFFECT ON VEHICLE OPERATION
At temperatures below 32° Fahrenheit where the linkage detaches in recirculation mode, it may not be able to clear condensation / fog from the inside of the front windshield or other windows. Failure to be able to de-mist the interior windows in a timely manner can restrict the driver’s field of vision and could lead to an increased risk of an accident.
SERVICE PROGRAM / REWORK ACTION
Owners will be notified by mail and instructed to take their vehicle to an authorized Land Rover retailer who will replace the link arm with a revised design and update the Climate Control module software. There will be no charge to owners for this action under this Program.
OWNER NOTIFICATION
Owners will receive a notification by mail on or before 23 April 2018.
ACTION TO BE TAKEN
Use the Jaguar Land Rover
 claims submission system to ensure that the vehicle is affected by this Program prior to undertaking any rework action.
Retailers are required to HOLD affected new vehicles that are within your control and refrain from releasing the vehicles for new vehicle sale pending completion of the rework action. Affected vehicles already in the hands of customers should be updated at the next available opportunity.
Jaguar Land Rover
 North America recommends that affected sales demonstrator and loaner vehicles are repaired before use and that used vehicles are repaired before sale. Retailers who choose to proceed against this recommendation, where legally permitted, must clearly and conspicuously disclose the open recall to the applicable customers.
Refer to Technical Bulletin N143NAS, SAFETY RECALL: HVAC Inlet Door Linkage, for detailed repair instructions.
PARTS
NOTE: only order the expected percentage demand of parts identified.
| DESCRIPTION | PART NO. / SUNDRY CODE | QTY. / VALUE* | EXPECTED PERCENTAGE DEMAND |
|---|---|---|---|
| Lever Arm Kit – Left Hand Drive (LHD) | LR114130 | 1 | 30 |
| Sill Trim Clip | LR092197 | 4 | 41 |
TOOLS
Refer to the Technical Bulletin referenced above for any required special tools.
WARRANTY
NOTE: use the Jaguar Land Rover
 claims submission system to ensure that a vehicle is affected by this program prior to undertaking any rework action.
At the time of confirming a booking for vehicle repair, ensure that all outstanding Recall and Service Actions are identified to ensure the correct parts are available and adequate workshop time is allocated for repairs to be completed in one visit.
Warranty claims must be submitted quoting the Program Code together with the relevant Option Code. The SRO and parts information listed have been included for information only. The Option Code(s) that allows for the drive in/drive out allowance may only be claimed if the vehicle is brought into the workshop for this action alone to be undertaken.
Repair procedures are under constant review and therefore times / prices are subject to change; those quoted here must be taken as guidance only. Refer to the Jaguar Land Rover
 claims submission system to obtain the latest repair time.
Warranty claims must be submitted for payment within 30 calendar days of completion of the repair.
UNSOLD VEHICLES
| PROGRAM CODE | OPTION CODE | DESCRIPTION | SRO | TIME (HOURS) | PARTS / SUNDRY CODE* | QTY. / VALUE* |
|---|---|---|---|---|---|---|
| N143 | A | Configuration – Automatic Temperature Control (ATC) ECU
Motor – Recirculation flap – Inspect | 80.90.12
80.10.89.39 | 0.2
0.1 | –
– | –
– |
| N143 | B | Configuration – Automatic Temperature Control (ATC) ECU
Motor – Recirculation flap – Inspect Drive in/drive out | 80.90.12
80.10.89.39 02.02.02 | 0.2
0.1 0.2 | –
– – | –
– – |
| N143 | C | Configuration – Automatic Temperature Control (ATC) ECU
Lever – Recirculation flap – Inspect and install | 80.90.12
80.10.89.40 | 0.2
0.6 | –
– | –
– |
| N143 | E | Configuration – Automatic Temperature Control (ATC) ECU
Lever – Recirculation flap – Inspect and install Drive in/drive out | 80.90.12
80.10.89.40
02.02.02 | 0.2
0.6
0.2 | –
–
– | –
–
– |
SOLD VEHICLES
| PROGRAM CODE | OPTION CODE | DESCRIPTION | SRO | TIME (HOURS) | PARTS / SUNDRY CODE* | QTY. / VALUE* |
|---|---|---|---|---|---|---|
| N143 | G | Lever – Recirculation flap – Renew and update software | 80.10.89.41 | 1.0 | LR114130
LR092197 | 1
1 |
| N143 | H | Lever – Recirculation flap – Renew and update software Drive in/drive out | 80.10.89.41
02.02.02 | 1.0
0.2 | LR114130 LR092197
– | 1
1 – |
Normal Warranty policies and procedures apply.
TECHNICAL Q & A: SAFETY RECALL
Main Message: An issue has been identified where the Climate Control system may not function correctly. The air inlet door linkages within the Climate Control system may become detached and, depending on operating mode position, cause unexpected severe condensation / fogging of the interior windows. .
| Q1 | Who do I contact if a member of the press contacts me about this recall? | ||
| A | Please ensure Press enquiries are referred to the Jaguar Land Rover Land Rover North America Press Office to the attention of:. North America Press Office to the attention of:.
| ||
| Q2 | Why is Jaguar Land Rover Land Rover recalling certain Jaguar recalling certain Jaguar vehicles? vehicles? | ||
| A | These vehicles are being recalled because this defect has the potential to cause degraded visibility unexpectedly and may not readily clear in some ambient conditions. | ||
| Q3 | Can you tell me more about what is wrong with the vehicles? | ||
| A | At temperatures below 32°F where the linkage detaches in recirculation mode, it may not be able to clear condensation / fog from the inside of the front windshield or other windows. Failure to be able to demist the interior windows in a timely manner can restrict the driver’s field of vision. | ||
| Q4 | How would the customer become aware of potentially having this concern? | ||
| A | Failure to demist the front and side windows or excessive fogging of the windows will indicate the onset of this issue. | ||
| Q5 | Does this concern affect vehicle safety? | ||
| A | Jaguar Land Rover Land Rover is conducting this as this as a Safety Recall. is conducting this as this as a Safety Recall. | ||
| Q6 | Has Jaguar Land Rover Land Rover Limited received many complaints? Limited received many complaints? | ||
| A | Jaguar Land Rover Land Rover has received a number of retailer and customer reports related to this issue. has received a number of retailer and customer reports related to this issue. | ||
| Q7 | Have there been any accidents or injuries? | ||
| A | Jaguar Land Rover Land Rover is aware of one related minor accident and is not aware of any injuries which have been attributed to this issue. is aware of one related minor accident and is not aware of any injuries which have been attributed to this issue. | ||
| Q8 | How was the condition discovered? | ||
| A | The condition was highlighted through market reports. | ||
| Q9 | How long has Jaguar Land Rover Land Rover known about this problem? known about this problem? | ||
| A | This issue started to be investigated as a possible safety hazard in late January 2018. | ||
| Q10 | Is the defect leading you to any concerns regarding the reliability of a system, which is supposed to be designed and engineered for the passengers’ safety? What type of measures are you planning to take? | ||
| A | We have no concerns with the overall reliability of the vehicle. Jaguar Land Rover Land Rover carefully monitors field data to ensure that any matters relating to safety and compliance are rigorously investigated. carefully monitors field data to ensure that any matters relating to safety and compliance are rigorously investigated. | ||
| Q11 | What has Jaguar Land Rover Land Rover done in production? done in production? | ||
| A | Vehicles are now manufactured with the required link travel restrictions and mechanical stops on the linkage. | ||
| Q12 | What will an authorized Land Rover retailer do to the vehicles? retailer do to the vehicles? | ||
| A | Authorized Land Rover retailers will replace the link arm with a revised design and update the Climate Control module software. retailers will replace the link arm with a revised design and update the Climate Control module software. | ||
| Q13 | Which vehicles are affected by this recall? | ||
| A | Land Rover Range Rover Velar vehicles manufactured from 14 April 2017 to 17 November 2017. Range Rover Velar vehicles manufactured from 14 April 2017 to 17 November 2017. | ||
| Q14 | Are other Jaguar Land Rover Land Rover models affected by these actions? models affected by these actions? | ||
| A | No other models, other than those listed on this document, are known to be affected by this condition. | ||
| Q15 | Are parts available to rework vehicles? | ||
| A | Yes, the necessary parts and software are available for authorized Land Rover retailers to conduct this repair. retailers to conduct this repair. | ||
| Q16 | How much will the recall cost Jaguar Land Rover Land Rover ? ? | ||
| A | Cost was not a factor in deciding to recall these vehicles. | ||
| Q17 | How do I know if my Land Rover vehicle is affected? vehicle is affected? | ||
| A | All owners of potentially affected vehicles will shortly receive a letter inviting them to contact an authorized Land Rover retailer for the work to be carried out. retailer for the work to be carried out. | ||
| Q18 | How long does it take for the vehicle to be inspected and repaired? | ||
| A | The work will be carried out as quickly and efficiently as possible in order to minimize inconvenience to customers and is expected to take no longer than one (1) hour. Due to retailer schedules, vehicles may be required for longer. | ||
| Q19 | Can I continue to drive my vehicle safely until it has been recalled? | ||
| A | Customers are advised to contact an authorized Land Rover retailer should they have any concerns regarding their vehicles. retailer should they have any concerns regarding their vehicles. |
N 1 4 3 N A S 2
TECHNICAL BULLETIN
2 1 M A R 2 0 1 8
INFORMATION
SECTION:
414-01: Climate Control
SUBJECT/CONCERN:
SAFETY RECALL: HVAC Inlet Door Linkage
AFFECTED VEHICLE RANGE:
| MODEL: | MODEL YEAR: | VIN: | ASSEMBLY PLANT: |
|---|---|---|---|
| Range Rover Velar (LY) | 2018 | 700315-740292 | Solihull |
MARKETS:
NORTH AMERICA
CONDITION SUMMARY:
This SAFETY RECALL supersedes Service Action N143 with immediate effect.
SITUATION:
An issue has been identified on certain vehicles within the listed Affected Vehicle Range where the linkages between the climate control system fresh air inlet door and servo motor may become detached, leading to a failure of the inlet door required for automatic temperature control.
ACTION:
Retailers are required to HOLD affected new vehicles that are within your control and refrain from releasing the vehicles for new vehicle sale pending completion of the appropriate Workshop Procedure detailed in this Technical Bulletin. Unsold vehicles should have this performed as part of the Pre-Delivery Inspection (PDI) process but must have it completed prior to vehicle handover to the customer.
Affected vehicles already in the hands of customers should be updated at the next available opportunity.
PARTS:
| NOTE: |
| Order only the expected percentage demand of parts identified. |
| DESCRIPTION | PART NO./SUNDRY CODE | QTY./VALUE | EXPECTED PERCENTAGE DEMAND |
|---|---|---|---|
| Lever arm kit – Left Hand Drive (LHD) | LR114130 | 1 | 30 |
| Sill trim clip | LR092197 | 4 | 41 |
SPECIAL TOOLS:
Jaguar Land Rover
 -approved Midtronics Battery Power Supply
Jaguar Land Rover
 -approved diagnostic tool with latest PATHFINDER software
Refer to TOPIx Workshop Manual/Workshop Procedure for any additional required special tools.
WARRANTY:
| NOTE: |
| Check DDW to make sure that a vehicle is affected by this program prior to undertaking any rework action. |
At the time of confirming a booking for vehicle repair, make sure that all outstanding Recall and Service Actions are identified to ensure the correct parts are available and adequate workshop time is allocated for repairs to be completed at one visit.
Warranty claims must be submitted quoting the Program Code and the relevant Option Code; this will result in payment of the stated time. The SRO and parts information is included for information only. The Option Code(s) that allows for the drive in/drive out allowance may only be claimed if the vehicle is brought back into the workshop for this action alone to be undertaken.
Repair procedures are under constant review and therefore times / prices are subject to change; those quoted here must be taken as guidance only. Refer to TOPIx to obtain the latest repair time.
Warranty claims must be submitted for payment within 30 calendar days of completion of the repair.
UNSOLD VEHICLE
| PROGRAM CODE | OPTION CODE | DESCRIPTION | SRO | TIME (HOURS) | PARTS/SUNDRY CODE | QTY./VALUE |
|---|---|---|---|---|---|---|
| N143 | A | Configuration – Automatic Temperature Control (ATC) ECU Motor – Re circulation flap – Inspect | 80.90.12 80.10.89 .39 | 0.2 0.1 | – – | – – |
| N143 | B | Configuration – Automatic Temperature Control (ATC) ECU Motor – Re circulation flap – Inspect Drive in/drive out | 80.90.12 80.10.89 .39 02.02.02 | 0.2 0.1 0.2 | – – – | – – – |
| N143 | C | Configuration – Automatic Temperature Control (ATC) ECU Lever – Recirculation flap – Inspect and install | 80.90.12 80.10.89 .40 | 0.2 0.6 | – – | – – |
| N143 | E | Configuration – Automatic Temperature Control (ATC) ECU Lever – Rec irculation flap – Inspect and install Drive in/drive out | 80.90.12 80.10.89 .40 02.02.02 | 0.2 0.6 0.2 | – – – | – – – |
SOLD VEHICLES
| PROGRAM CODE | OPTION CODE | DESCRIPTION | SRO | TIME (HOURS) | PARTS/SUNDRY CODE | QTY./VALUE |
|---|---|---|---|---|---|---|
| N143 | G | Lever – Recirculation flap – Renew and update software | 80.10.89.41 | 1.0 | LR114130 LR092197 | 1 4 |
| N143 | H | Lever – Recirculation flap – Renew and update software Drive in/drive out | 80.10.89.41 02.02.02 | 1.0 0.2 | LR114130 LR092197 – | 1 4 – |
Normal Warranty policies and procedures apply.
DIAGNOSTIC/WORKSHOP PROCEDURE – UNSOLD VEHICLES:
| CAUTIONS: |
|
| NOTES: |
|
This procedure is for UNSOLD vehicles only.
The following steps must be followed as written to ensure proper positioning of the actuator arm for linkage reconnection.
1
Connect the Jaguar Land Rover
 -approved Midtronics battery power supply to the vehicle startup battery.
2
| NOTE: |
The Jaguar Land Rover Land Rover -approved diagnostic tool must be loaded with PATHFINDER version 146 (or later). -approved diagnostic tool must be loaded with PATHFINDER version 146 (or later). |
Connect the Jaguar Land Rover
 -approved diagnostic tool to the vehicle and begin a new session.
3
| NOTE: |
The Jaguar Land Rover Land Rover -approved diagnostic tool will read the correct Vehicle Identification Number (VIN) for the current vehicle and automatically take the vehicle out of Transit mode if required. -approved diagnostic tool will read the correct Vehicle Identification Number (VIN) for the current vehicle and automatically take the vehicle out of Transit mode if required. |
Follow the on-screen prompts.
4
Select ECU Diagnostics.
5
Select HVAC Control Module [HVAC].
6
| NOTES: |
|
Select Update ECU.
- Follow all on-screen instructions until the application completes successfully and the link inspection steps are completed.
- If the recirculation blend door actuator lever arm is connected and the recirculation blend door does operate correctly, go to Step 18.
- If the recirculation blend door actuator lever arm is not connected and the blend door does not operate correctly, go to Step 7.
7
Disconnect the vehicle startup battery ground cable (see TOPIx Workshop Manual section 414-01: Battery and Charging System – Battery, Mounting and Cables – General Procedures – Battery Disconnect and Connect).
8
| CAUTION: |
| Make sure the treadplate retaining clips do not drop into the body. |
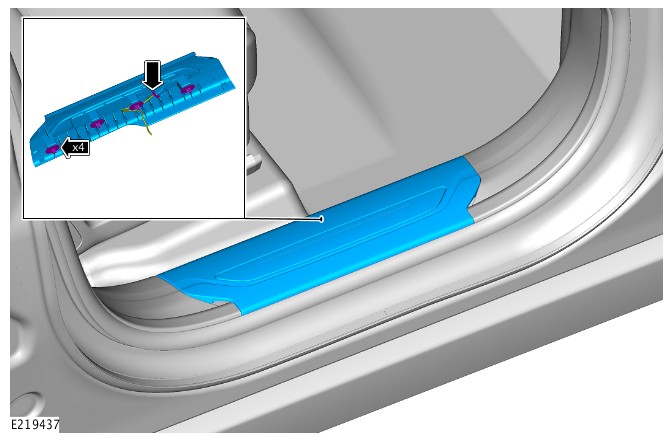
Remove the front right treadplate.
9
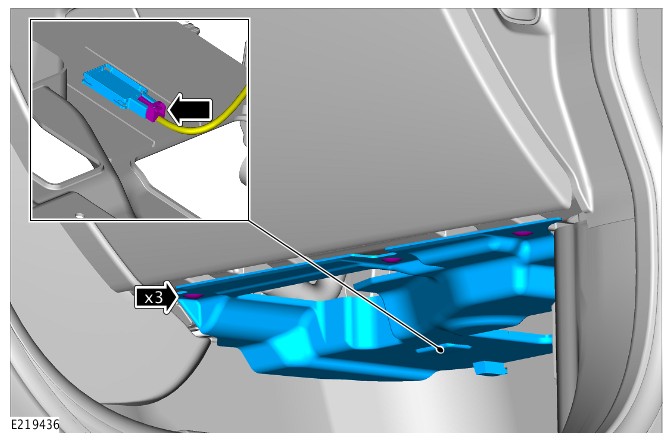
Remove the front right footwell trim panel.
10
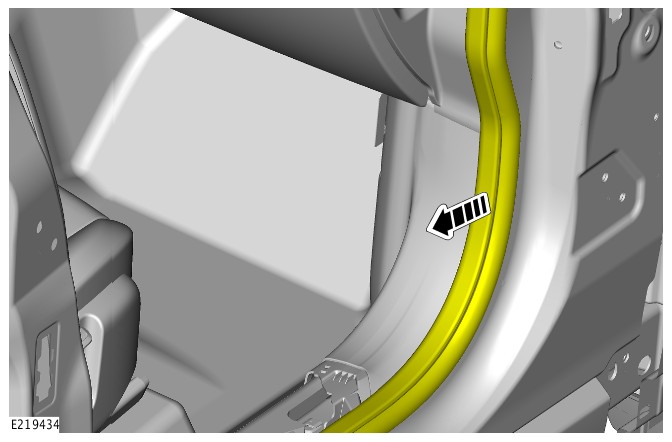
Release the front right door aperture seal and position to one side.
11
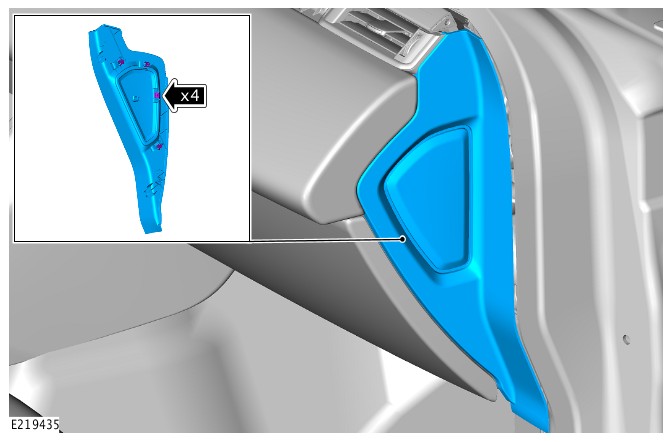
Remove the instrument panel right trim.
12
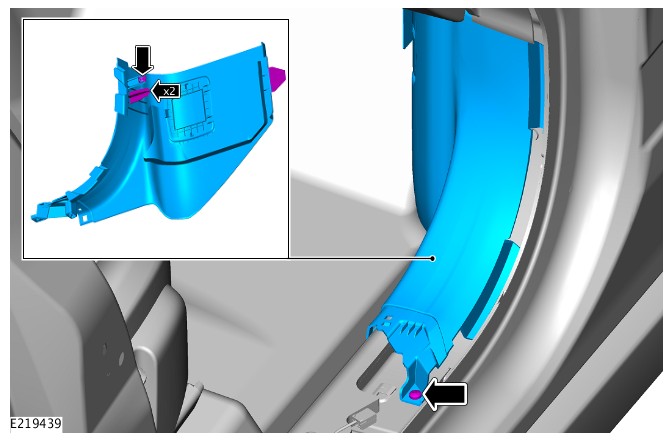
Remove the right A-pillar lower trim panel.
- Torque: 3.5 Nm
13
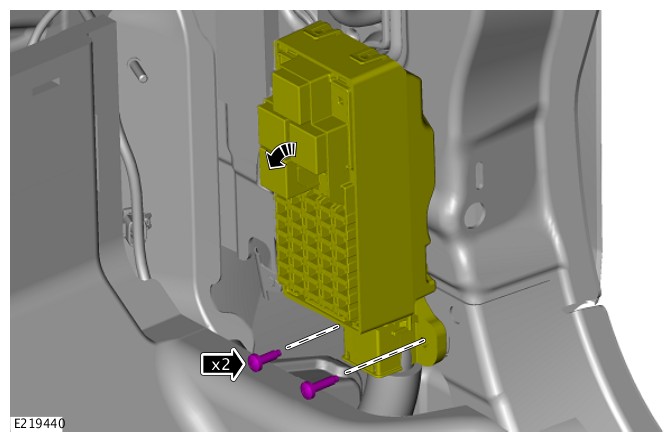
Position the junction box to one side.
- Torque: 10 Nm
14
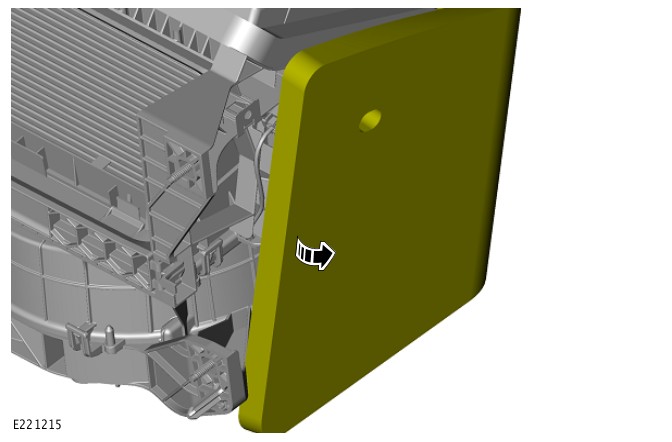
Position the Noise, Vibration & Harshness (NVH) material to one side.
15
| CAUTION: |
| Do not use excessive force to install the actuator lever arm. |
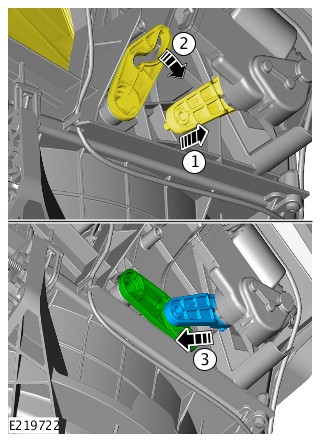
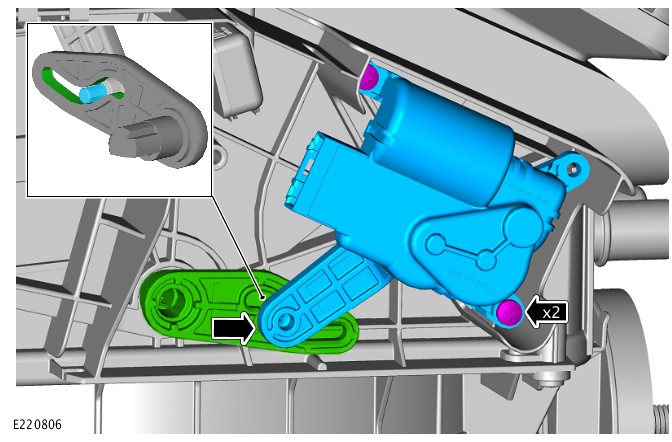
Install the recirculation blend door actuator lever arm into the recirculation door.
16
Reverse steps 9-16.
17
Connect the vehicle startup battery ground cable (see TOPIx Workshop Manual section 414-01: Battery and Charging System – Battery, Mounting and Cables – General Procedures – Battery Disconnect and Connect).
18
Exit the current session.
1 If required, reset the vehicle to Transit mode.
2 Select the Exit icon.
19
Disconnect the diagnostic tool and battery power supply from the vehicle.
DIAGNOSTIC/WORKSHOP PROCEDURE – SOLD VEHICLES:
| CAUTIONS: |
|
| NOTES: |
|
This procedure is for SOLD vehicles only.
The following steps must be followed as written to ensure proper positioning of the actuator arm for linkage reconnection.
1
Connect the Jaguar Land Rover
 -approved Midtronics battery power supply to the vehicle startup battery.
2
| NOTE: |
The Jaguar Land Rover Land Rover -approved diagnostic tool must be loaded with PATHFINDER version 146 (or later). -approved diagnostic tool must be loaded with PATHFINDER version 146 (or later). |
Connect the Jaguar Land Rover
 -approved diagnostic tool to the vehicle and begin a new session.
3
| NOTE: |
The Jaguar Land Rover Land Rover -approved diagnostic tool will read the correct Vehicle Identification Number (VIN) for the current vehicle and automatically take the vehicle out of Transit mode if required. -approved diagnostic tool will read the correct Vehicle Identification Number (VIN) for the current vehicle and automatically take the vehicle out of Transit mode if required. |
Follow the on-screen prompts.
4
Select ECU Diagnostics.
5
Select HVAC Control Module [HVAC].
6
| NOTES: |
|
Select Update ECU.
7
| CAUTION: |
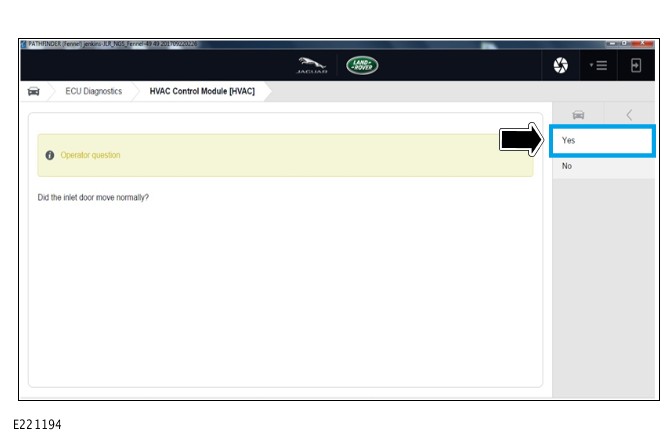
| When selecting ‘Yes‘, the software will update. This update MUST be completed BEFORE replacing the lever arm. |
Follow the on-screen prompts until the following text appears on-screen.
- You are required to select ‘Yes’ in order to continue with the procedure, this will then update the HVAC control module software.
8
Follow the on-screen prompts.
9
Disconnect the diagnostic tool and battery power supply from the vehicle.
10
Disconnect the vehicle startup battery ground cable (see TOPIx Workshop Manual section 414-01: Battery and Charging System – Battery, Mounting and Cables – General Procedures – Battery Disconnect and Connect).
11
| CAUTION: |
| Make sure the treadplate retaining clips do not drop into the body. |
Remove the front right treadplate.
12
Remove the front right footwell trim panel.
13
Remove the front right door aperture seal and position to one side.
14
Remove the instrument panel right trim.
15
Remove the right A-pillar lower trim panel.
- Torque: 3.5 Nm
16
Position the junction box to one side.
- Torque: 10 Nm
17
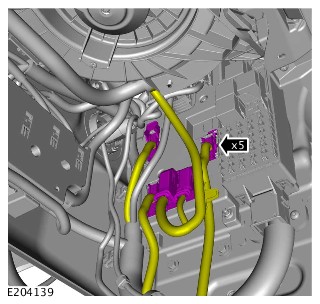
Disconnect the 5 electrical connectors from the Body Control Module/Gateway Module (BCM/GWM) assembly.
18
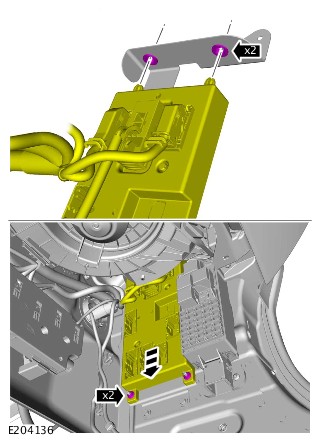
Remove the 2 retaining nuts.
- Lower the BCM/GWM assembly.
- Torque: 10 Nm
19
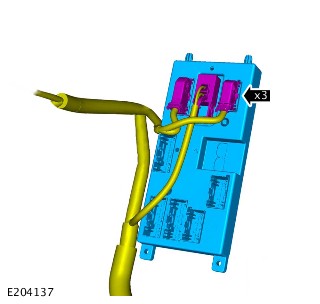
Disconnect the 3 electrical connectors from the BCM/GWM assembly.
- Remove the BCM/GWM assembly.
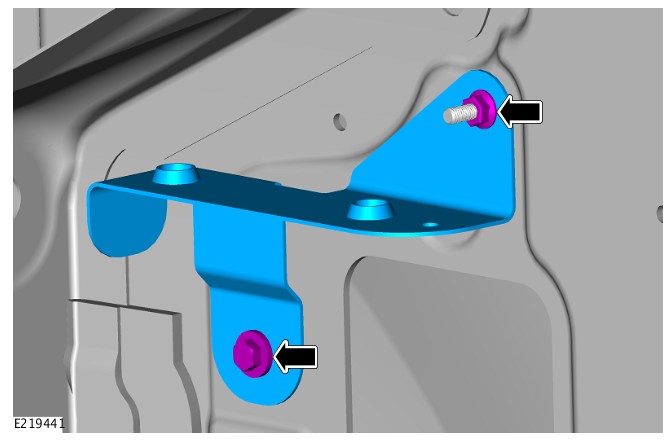
20
Remove the BCM/GWM upper mounting bracket.
- Torque: 10 Nm
21
Position the Noise, Vibration & Harshness (NVH) material to one side.
22
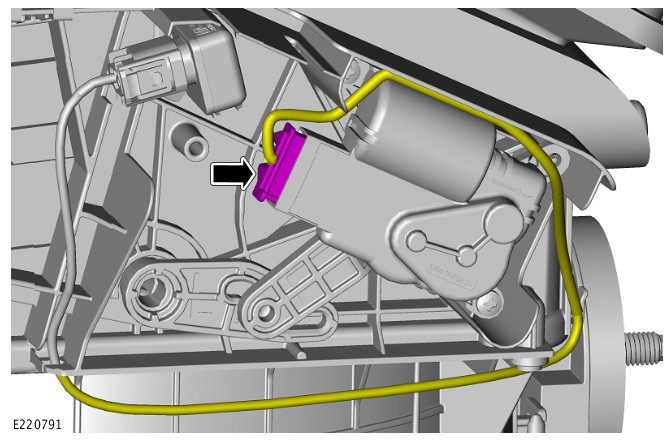
Disconnect the recirculation blend door actuator electrical wiring harness and position to one side.
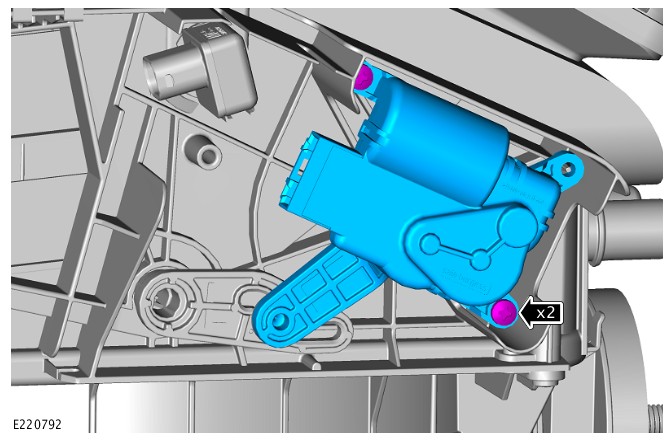
23
Remove the recirculation blend door actuator.
24
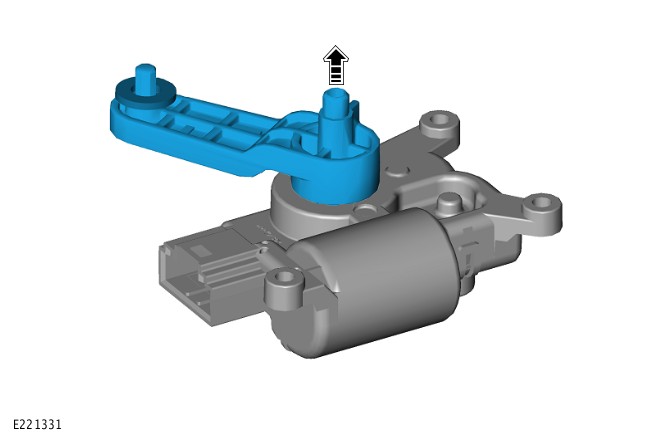
Remove the recirculation blend door actuator lever arm from the actuator.
25
| CAUTION: |
| This step must be completed using a clean glove. |
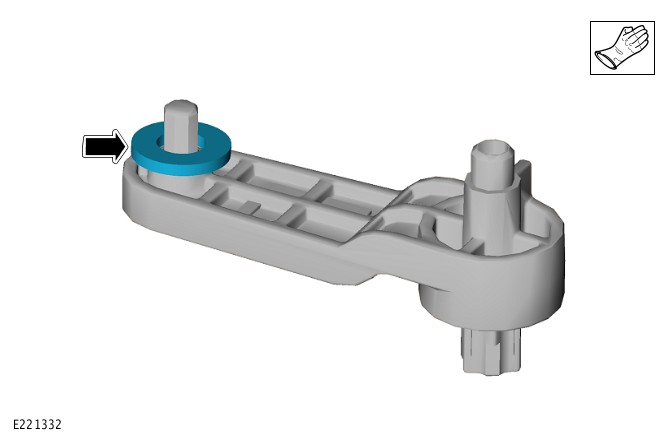
Remove and retain the foam washer from the recirculation blend door actuator lever arm.
26
| CAUTION: |
| This step must be completed using a clean glove. |
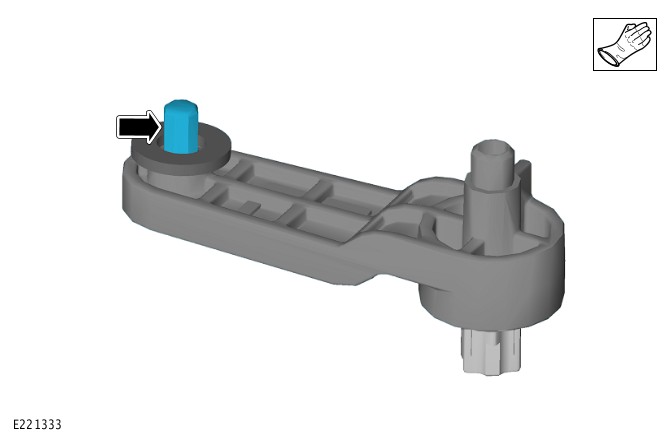
Recover any grease from the recirculation blend door actuator lever arm as shown.
27
| CAUTION: |
| This step must be completed using a clean glove. |
Apply the recovered grease to the new recirculation blend door actuator lever arm as shown.
28
| CAUTION: |
| This step must be completed using a clean glove. |
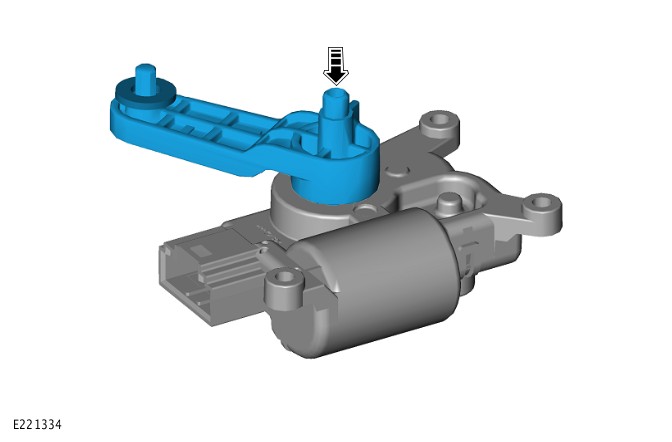
Install the original foam washer to the new recirculation blend door actuator lever arm.
29
Install the recirculation blend door actuator lever arm to the actuator.
30
| CAUTIONS: |
|
Install the recirculation blend door actuator.
- Install the recirculation blend door actuator retaining screws.
- Torque: 1.5 Nm
31
Reverse steps 11-21.
32
Connect the vehicle startup battery ground cable (see TOPIx Workshop Manual section 414-01: Battery and Charging System – Battery, Mounting and Cables – General Procedures – Battery Disconnect and Connect).
33
Connect the battery power supply to the vehicle startup battery.
34
Connect the diagnostic tool to the vehicle and continue the session.
35
Exit the current session.
1 If required, reset the vehicle to Transit mode.
2 Select the Exit icon.
36
Disconnect the diagnostic tool and battery power supply from the vehicle.
1 Affected Product
Vehicle
LAND ROVER | RANGE ROVER VELAR | 2018 |
11 Associated Documents
Recall Acknowledgement
RCAK-18V139-8077.pdf 245.818KB
 Loading...
Defect Notice 573 Report
 Loading...
ISSUED Owner Notification Letter(Part 577)
RCONL-18V139-4882.pdf 763.979KB
 Loading...
Manufacturer Notices(to Dealers,etc)- 15-MAR-18 – NOTIFICATION OF SAFETY RECALL N143 (NHTSA 18V139)
 Loading...
Remedy Instructions and TSB
RCRIT-18V139-2238.pdf 1060.024KB
 Loading...
Manufacturer Notices(to Dealers,etc)- SAFETY RECALL N143 (NHTSA 18V139): HVAC INLET DOOR LINKAGE – 22-MAR-18
RCMN-18V139-5045.pdf 523.345KB
 Loading...
Recall 573 Report – AMENDMENT 1
RCLRPT-18V139-1661.PDF 215.973KB
 Loading...
Recall Quarterly Report #1, 2018-2
RCLQRT-18V139-6403.PDF 214.538KB
 Loading...
Recall Quarterly Report #2, 2018-3
RCLQRT-18V139-0828.PDF 211.263KB
 Loading...
Recall Quarterly Report #3, 2018-4
RCLQRT-18V139-4846.PDF 211.355KB
 Loading...
Recall Quarterly Report #4, 2019-1
RCLQRT-18V139-8901.PDF 211.462KB
 Loading...
Recalls Documents
Reprogramming
JLR Symptom Driven Diagnostics (SDD) for Independent Repairers: Diagnostic Software / Module programming subscriptions - without security access - can be purchased via TOPIx (From the User ID - Options Menu – Programming subscriptions – click add). Module programming - with security access - is necessary to program the IPC, BCM, ECM (PCM), KVM, as well as keys. Licensed locksmiths and independent repairers must be active members of the National Automotive Service Task Force (NASTF) Vehicle Security Professional (VSP) registry and will need to purchase a subscription to Independent Module Programming with Security Access to program these components. Currently we are only able to support yearly module programming subscriptions with security access. SDD will only support Jaguar vehicles built from 1995 MY onward.
- J2534 Pass-Thru Programmer: TOPDON RLink J2534 is an advanced diagnostic and reprogramming tool that support all J2534 protocols, as well as D-PDU, CAN-FD and DoIP, ensuring compatibility with a wide range of modern vehicles. It offers extensive versatility with support for over 17 major automotive brands, including Chrysler, Ford, GM, Nissan, Toyota, Honda, Subaru, Land Rover/Jaguar, Volvo, Wuling, Volkswagen, Mercedes-Benz, and BMW, and so on, enjoy dealership-level functions at your fingertips
- All-in-One OEM Diagnostics: This J2534 ECU programming tool elevates your automotive repair capabilities to new heights by delivering complete OEM diagnosis. Boasting comprehensive full-system diagnostics, intuitive repair guides, advanced ECU programming and coding, common reset services, a vast library of repair information and more, this all-in-one solution empowers technicians to effortlessly tackle complex vehicle issues with ease
- Proven Performance You Can Trust: Backed by over 10000 real vehicle tests and benefit from a wealth of practical experience, this OEM reprogramming tool guarantees stable and exceptional performance. Supported by TOPDON's dedicated technical experts with in-depth knowledge of both auto repair and J2534 Pass-Thru programming, the RLink J2534 provides prompt and professional assistance, ensuring a smooth setup and reliable compatibility
- Integrated Excellence, Always Up-to-Date: Featuring the exclusive RLink Platform to provide a streamlined experience with one-click driver installation and management, ensuring flawless integration with your OE software, maintaining the original performance quality. The built-in operation guide makes mastering OE software quick and easy, so you can get started right away. Plus, with lifetime free updates, your diagnostics will stay current with the latest drivers and innovations
- Efficiency Meets Versatility: Engineered to support three CAN channels simultaneously - CAN FD and CAN-CC included, giving you the edge in fast troubleshooting. To perfectly synchronized with the OE software, please diagnose with active subscriptions and make sure your computer system is running a compatible 64-bit Windows version (7, 8, 10 or later) to fully leverage the power of RLink J2534. *We don't provide extra OE software
- 【J2534 PROTOCOL WITH SMARTLINKC】 LAUNCH X431 PRO3S+ ELITE scan tool with newly upgraded smartlinkC V2.0. The SmartLinkC is a communication interface supporting J2534 specifications. Of course, it also can be used as a J2534 PassThru device, working together with the PC installed with the OEM diagnostic software to perform the J2534 protocol.J2534 protocol is the only solution for problems ranging from driveability and loss of power to poor fuel economy.
- 【INTELLIGENT TOPOLOGY MAP TO FASTER FULL SYSTEMS DIAGNOSIS】 X431 PRO3S+ELITE bidirectional scan tool with new-added intuitive topology mapping. Harnesses intuitive topology mapping for comprehensive visualization of the vehicle all system. It shows all available control units in different colors, the numbers of system, the scanned system, and the scan results, bringing maximum convenience & superfast speed for you to do swift diagnosis & high-level repairs.
- 【TOP HARDWARE CONFIGURATION, UPGRADED OF LAUNCH X431 PRO3S+】 LAUNCH X431 PRO3S+ELITE diagnostic scanner possess with Android 10.0 OS; CPU 4-Core Processor, 2.0 GHz. Greatly increased the speed of running multiple task. 2.4GHz/5GHz; 6300mAh/7.6V stronger battery capacity; 10.1 Inch Touchscreen with 8MP camera; AUTO VIN; 4GB+64GB storage memory; 20X faster transmission rate, save more vehicle documents and customer data; Supports 25+ Software Languages, such as EN, DE, FR, SP nd JP and so on.
- 【3000+ ACTIVE TEST/BI-DIRECTIONAL CONTROL LAUNCH SCANNER】 LAUNCH X431 PRO3S+ELITE HD automotive scanner is a cost-effective bidirectional scanner that deserves owned by every repairing DIYers and mechanics. You can easily send command signal at fingertips from the scanner to various module actuators to test component integrity and functionality in minutes or even seconds to tell if replacement or repair is needed.
- 【COMPLETE 60+ HOT RESETS, CALIBRATION, INITIALIZATION, RELEARN】 LAUNCH X431 PRO3S+ELITE SmartLinkC escaner automotriz professional enjoys 60+ special service, such as Oil Reset, ABS brake bleed, EPB, SAS, BMS, Suspension, Injector reset, Power Balance, Turbo Calibration, VGT, Transmission Adaption, Throttle Adaptation, matching and etc. rigorous on-site testing has been performed to ensure 100% availability.
- Industry-leading J2534 Pass-Thru Technology: Enabling diagnostics, reprogramming and security functions for dealerships and the independent repair facility. Economical and compact pass-thru devices provides an easy-to-use interface that allows you to repair complex vehicles with OE applications in your shop. Each type (see single branded types above) Mongoose-Plus is engineered to work with one of the following OEM's J2534 applications for Chrysler, Ford, GM, Nissan, Toyota, Subaru, & VW/Audi.
- Supports Current GM Vehicles: Now includes CAN-FD, DoIP (Diagnostics over Internet Protocol - as defined in J2534-2) and support for J2534 version 5.0. This is the tool that GM dealerships use for diagnostics and reprogramming.
- NEW Bluetooth Wireless Options Available: Providing wireless connectivity between your laptop and the Mongoose-Plus
- Expert Product Support: Staffed by technicians who understand vehicle repair and J2534 Pass‑Thru applications to help you with any technical setup questions
- Key Registration and Immobilizer Support: Using NASTF Vehicle Security Professional credentials
- ALL OF THE J2534 PROTOCOLS - This single unit has all of the protocols you need for your OEM J2534 reprogramming and diagnostics including the latest in DoIP and CanFD
- J2534 TECHNICAL SUPPORT - FREE for the life of the tool. Staffed by technicians who understand vehicle repair and J2534 Pass‑thru
- TOOLBOX WITH OEM APPLICATION DESCRIPTIONS - educational video tutorials and real-time news – Giving you the confidence and up-to-date knowledge to get the job done
- J2534 v05.00 API - The newest version of J2534 to give you the latest in pass-thru technology
- FUTURE PROOF WITH 4 CAN CHANNELS - Going beyond the 3 required by select Chrysler/FCA models, CarDAQ-Plus 3 also provides a 4th to meet the needs of future OEM applications
- CUSTOM-DESIGNED FOR USE WITH FORSCAN: Works with all FORScan compatible vehicles and is recommended by the FORScan Team
- DEALERSHIP-LEVEL DIAGNOSTICS: OBDLink EX supports all Ford protocols, modules, and advanced features of FORScan
- ELECTRONIC SWITCH allows FORScan to access all CAN buses simultaneously and enables advanced functions not possible with “toggle switch” adapters
- MAXIMUM THROUGHPUT -- up to 20 times faster than “toggle switch” adapters
- ROCK-SOLID CONNECTION avoids data corruption and dropped packets
- 【2025 NEWEST LAUNCH 1st Advanced Scan Tool Compatible With 12V&24V Vehicles】Design for Passenger&Commercial Vehicles 2 in1,work for Cars/Trucks/buses/trailers/excavators/diesel engine/pick-up/etc.
- 【J2534 Reprogramming with Smartlink C】Advanced OEM J2534 reprogramming,Helps access direct data online, replace existing software/firmware in ECU,program new ECUs and fix software-controlled issue.
- 【Over 60 Service Reset Functions + Bi-Directional + ECU Coding 】This scan tool can support ECU Coding,60+ reset service functions like SAS/EPB/TPMS/DPF/Oil/Brake/ABS Bleed, Injector coding, etc.
- 【2025 BEST Advanced Hardware & All Systems Diagnosis+Topology Display 】Support All systems Diagnostic including ENG, AT, ECM, TCM, ABS, SRS, BCM, BMS, TPMS, SAS, Fuel System, Light System and more.
- 【Wider Vehicle Coverage of 12V & 24V Vehicles + 25 Languages】LAUNCH X431 PRO3S+SMARTLINK HD automotive scanner is ALL-IN-ONE Scan Tool for 12V cars and 24V Heavy-duty trucks support CANFD & DOIP.
Last update on 2025-04-17 / Affiliate links / Images from Amazon Product Advertising API
This product presentation was made with AAWP plugin.

